What is FO13?[]
 |
Chowder McArthor, the Survivor says: "I'm so happy you're here! All you need to do is stick me with that stimpak over there and you'll save my life!...Please tell me you know what a stimpak is right? Maybe you should educate yourself a little bit before you start giving me false hope!" |
Fallout 13 is a multiplayer sandbox that has a heavy focus on player interaction.
At the start of each round, each player is assigned a role across the wasteland. There are many jobs, such as the Head Scribe performing research and development of new technologies, or a simple Pusher, there are many different ways to play.
Before Playing[]
It's important to read the rules before connecting for the first time. There's a lot on the page, but at a bare minimum read the Escalation rules[1].
- Escalation rules in a nutshell: Give your opponent a decision to make. Either do "X or Combat".
- Against faction bases, the leader of the raid must proclaim hostility to the gate guards; E.G. "NCR DIES TODAY WITH YOU!" before firing rounds off.
- The goal is to give other players agency and the ability to role-play without just getting randomly shot from half a world a way. Some common examples of what would be escalation on another player follows below:
- "Waster, drop your shit on the ground or I'll blow your head off."
- "Get on the ground or die Legion Scum!"
- "Halt or we will fire!"
Some common new player mistakes to avoid include:
- Being violent towards other Wastelanders without any escalation. (Telling the admins you were "roleplaying an insane person" won't get a couple laughs, and you'll just get banned.)
- Asking questions in OOC (out-of-character) chat that are directly related to anything happening in the round. For example, "Why did I just get killed by the clown?". It's okay to discuss this in deadchat or after the round is over. These questions are also alright if asked in adminhelps. (press F1).
- Not following the name format of "Firstname Lastname" when creating a character.
- Raiders can have more freedom in their name schemes, just avoiding direct pop culture references.
- Legionnaires are required to abide by stricter names, picking Latin/Roman names.
The admin team generally tries to give players benefit of the doubt, so it's okay to mess up. As long as you're polite and willing to learn from your mistakes, you won't be in trouble. You can press F1/the adminhelp button at any time to send a message directly to the admin team if you have any questions.
Setting Up[]
Make your way to the BYOND download page and download the client. Once you've downloaded, installed, and logged into the client, feel free to close it - we won't be needing to use it directly anymore.
- Server (Bad Deathclaw TG Edition - [ENG] Bad Deathclaw): <byond server=byond://45.55.56.134:1945>
If you can't use this link to join, open the BYOND client, press Ctrl and O, and paste the link to the server you want to join.
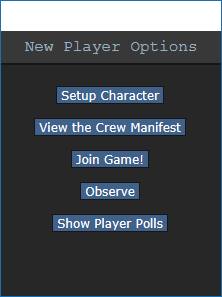
The New Player Options menu
Once you've connected to a server, you'll be greeted by a small popup window labelled New Player Options.
If this is your first time playing on Bad Deathclaw, you'll need to create a character. Click on the Setup Character button, and the character creation menu will open.
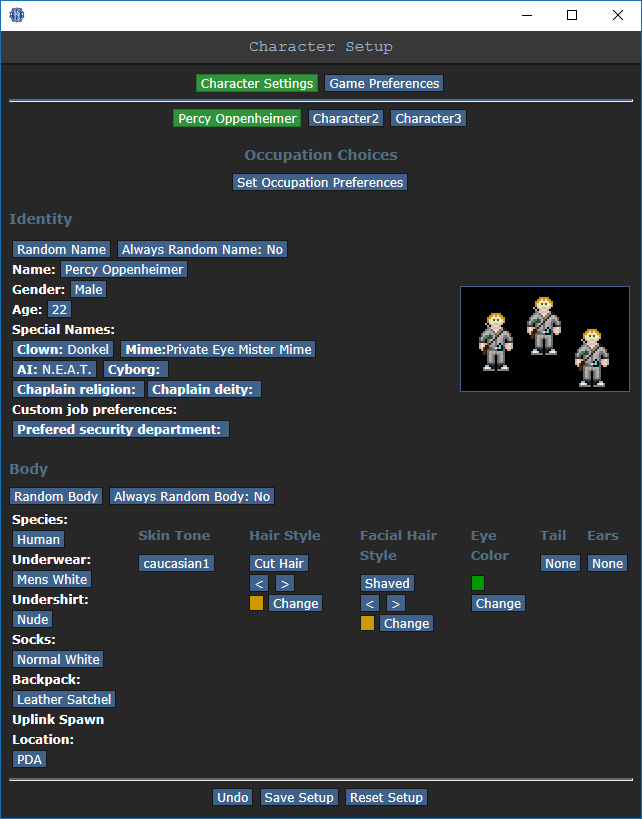
The character setup screen
You don't need to worry about Special Names, Custom job preferences, Uplink Spawn Location, or Species - for now, make sure you're a human, and edit your appearance as you see fit. There's no difference between clothing options other than appearance, so pick what you think looks best. Satchels carry fewer items than duffel-bags, however they do not slow you down as much.
Once you've finished editing your appearance, be sure to press the Save Setup button at the bottom of the window. Next, press the Set Occupation Preferences button.
|
Chowder McArthor, the Survivor says: "Before you go all crazy selecting Raider or Pusher, you might consider trying one of the Recruit roles in NCR or Legion. It's easier to win a gunfight when you've got 30 more guns behind you!" |

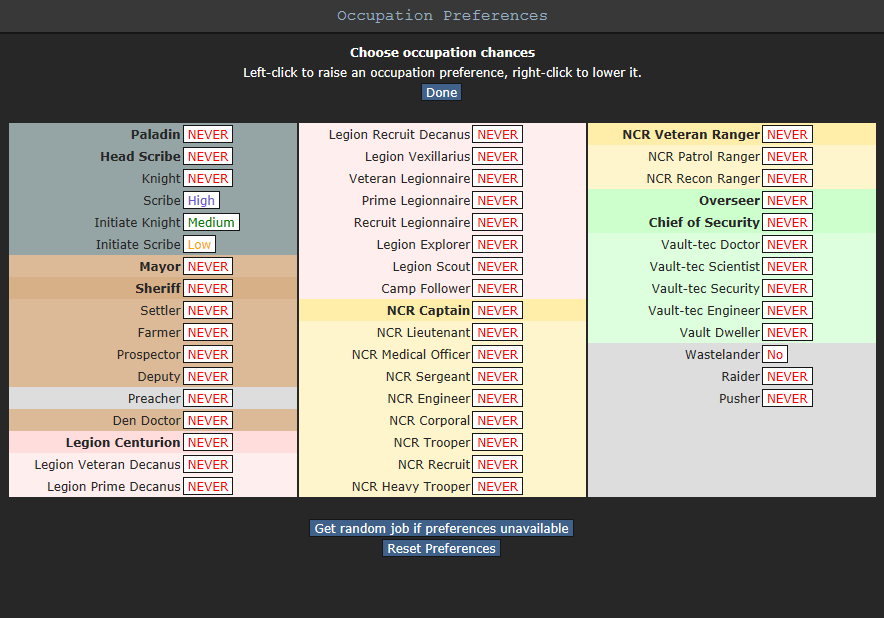
The occupation preferences window
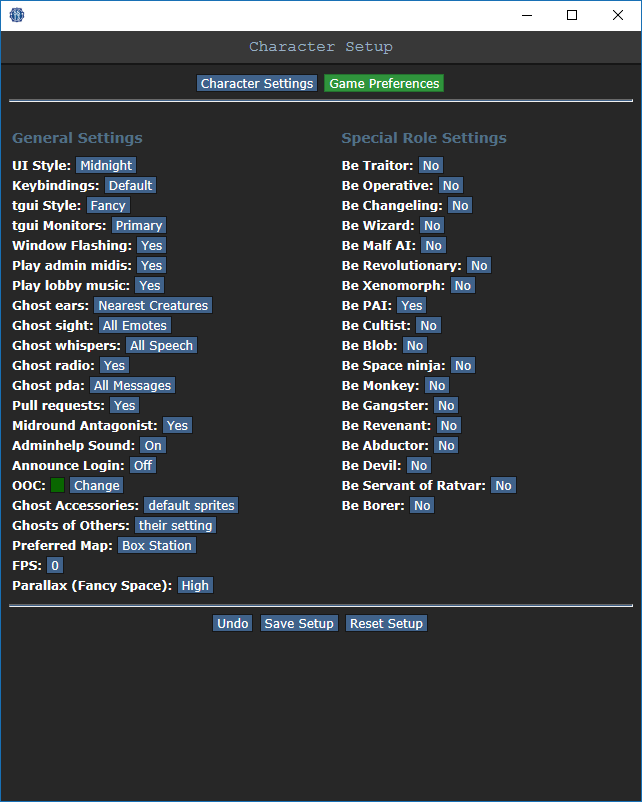

The game preferences window
If the button next to Recruit is a red Never, click it a few times so that it says High in green text. This sets your job to be a recruit, no matter what.
After that, press Done, then, Save Setup. Then click on Game Preferences at the top of the character creation screen. The menu will change and have a big list of options.
Change the Keybindings option to "Hotkeys". This guide will assume you're using this control scheme, as it provides quicker functions for actions than the default controls. Most of the options here are relatively self explanatory or irrelevant, so once you're done, click Save Setup one last time and close the window.
Joining the Game[]
Now that you've created your character, you're ready to join the game. (You may want to continue to read the guide before jumping in.)
There's two possible menus here - the lobby screen will either display a list that has Join Game! or a Ready/Not Ready toggle.

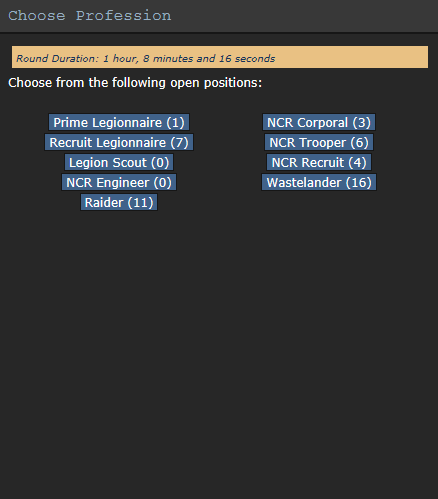
The choose profession window
Click on the button, and a window will pop up asking you to choose a profession. The jobs available will vary, but for now, pick Recruit Legionnaire or NCR Recruit. (The numbers in the brackets next to the job title show the current number of players who have been assigned that job for the round, if there is a zero inside the brackets, no one has been assigned to that job for the round. When you click on the job you want, you'll spawn into whatever location is considered the "base" for your faction.
Ready/Not Ready/Observe, If the window has three buttons that say Ready, Not Ready, and Observe, that means a round has not started yet.
This is ideal, because you'll be playing the round from the beginning, when things are the going to be calm and allow you to get your bearings in a relatively safe environment. Toggle the button to Ready, then wait for the game to begin. (You can see the time until the game begins on the Lobby tab, on the top right of the game window.)
Pressing Observe will spawn you as a ghost, which is essentially a spectator - you won't be able to re-spawn for ten minutes or until the next round if you select this option!
Interface 101[]
Tabs[]


Status tab
Before you do anything else, take a look at the top right of the game window. You'll see some tabs labelled Status, Lobby, Admin, IC, OOC, Object, and Preferences. The most important tabs are the Status and Admin tabs. If you're using internals (an oxygen tank and mask), the Status tab tells you the remaining air pressure - useful for avoiding death by suffocation. The Admin tab contains the Adminhelp button, used to contact admins directly if you have a question or believe someone is breaking the rules.
In the Status tab, take note of the map currently being played on the server. It'll be used later in the guide.
HUD[]
|
Chowder McArthor, the Survivor says: "Hitpoints? The hell are those? Stop talking about your D&D session and hit me with that damn stimpak!" |
The biggest barrier to entry in Fallout 13 is the controls. The UI is, at a glance, complex, and the controls are unintuitive. Thankfully, once it clicks, you'll never have an issue with it again. Don't let it overwhelm you - after a round or two of practice, you should be fine.
The top right of the screen contains the action tabs mentioned previously, and the bottom right is the text log. This is where you can see what people are saying, what's happening around you, and chat such as OOC or adminhelps. The bar along the bottom of the screen is the input bar, but since we're on Hotkey mode we won't need to use it. There's quite a few HUD elements on the main screen, so let's break them down into sections. Don't worry if you can't memorize what everything does at once - you can always come back to this guide.
<tabs>
<tab name="Hands">![]() One of the most important elements of the HUD. You have the ability to hold an item in each hand (unless an item takes up both hands, obviously). The square around one of the hands is the selected hand. If you have an empty selected hand, and click on an object, you'll pick it up/open it/use it. If an object is in your selected hand and you click on something, you'll use it on the item you're holding. (The way this works means that if you'd like to unequip your backpack, you need to click and drag the bag into your hand - if it was removed by clicking on it, you'd never be able to open the bag.)
One of the most important elements of the HUD. You have the ability to hold an item in each hand (unless an item takes up both hands, obviously). The square around one of the hands is the selected hand. If you have an empty selected hand, and click on an object, you'll pick it up/open it/use it. If an object is in your selected hand and you click on something, you'll use it on the item you're holding. (The way this works means that if you'd like to unequip your backpack, you need to click and drag the bag into your hand - if it was removed by clicking on it, you'd never be able to open the bag.)
If this seems confusing, don't worry - it'll be explained shortly.
The backpack ![]() icon can be toggled to show your worn equipment.
icon can be toggled to show your worn equipment.
The belt ![]() , backpack
, backpack ![]() , and pocket
, and pocket ![]() icons are all storage locations.
icons are all storage locations.
The ID ![]() slot can hold your ID, or your PDA (which can hold your ID).
slot can hold your ID, or your PDA (which can hold your ID).
The drop ![]() and throw
and throw ![]() icons do what the name implies. Dropping is self explanatory, but the throw button is a toggle - if it's on and you click somewhere, you'll throw the item in your hand at where you clicked. (You can also press R to enable throwing and Q to drop your held item.)
icons do what the name implies. Dropping is self explanatory, but the throw button is a toggle - if it's on and you click somewhere, you'll throw the item in your hand at where you clicked. (You can also press R to enable throwing and Q to drop your held item.)
The pull ![]() icon only appears when dragging something, and can be pressed to stop dragging an object. Hotkey: "del".
icon only appears when dragging something, and can be pressed to stop dragging an object. Hotkey: "del".
The internals ![]() icon can be clicked to enable/disable your internals (oxygen tank and breath mask).
icon can be clicked to enable/disable your internals (oxygen tank and breath mask).
The resist ![]() icon can be pressed to break out of grabs, restraints, and if you're on fire, is the "stop drop and roll" button. Hotkey: "B".
icon can be pressed to break out of grabs, restraints, and if you're on fire, is the "stop drop and roll" button. Hotkey: "B".
The run/walk toggle ![]() icon can be pressed to switch between running and walking. Running is faster, but walking has benefits, such as being able to walk over water without slipping - useful for when the janitor doesn't put wet floor signs down. Hotkey: Hold "alt" to walk.
icon can be pressed to switch between running and walking. Running is faster, but walking has benefits, such as being able to walk over water without slipping - useful for when the janitor doesn't put wet floor signs down. Hotkey: Hold "alt" to walk.
The body selector ![]() icon is used to choose which body part you want to target. This is used for both targeting specific sections to heal, or targeting specific sections when attacking someone. Click a limb to target it. (You can target individual arms, legs, the head, the upper torso, the groin, the eyes, or the mouth.) Hotkeys: "numpad keys".
icon is used to choose which body part you want to target. This is used for both targeting specific sections to heal, or targeting specific sections when attacking someone. Click a limb to target it. (You can target individual arms, legs, the head, the upper torso, the groin, the eyes, or the mouth.) Hotkeys: "numpad keys".
Last but not least is the intent selector ![]() - this will be explained in detail later. It has four modes: Help, Disarm, Grab, and Harm, in clockwise order. Hotkeys: "1-4". The health
- this will be explained in detail later. It has four modes: Help, Disarm, Grab, and Harm, in clockwise order. Hotkeys: "1-4". The health ![]() icon and
icon and ![]() doll change depending on how injured you are.
doll change depending on how injured you are.
The crafting menu ![]() icon opens the crafting menu.
icon opens the crafting menu.
The speech bubble ![]() icon opens the languages menu. You won't need to use this for the tutorial.
icon opens the languages menu. You won't need to use this for the tutorial.
The create area ![]() icon is used to create an "area", which is a more advanced topic. You won't need to worry about it for this tutorial.
icon is used to create an "area", which is a more advanced topic. You won't need to worry about it for this tutorial.
These will only appear on the HUD if something is wrong.
![]() Oxygen warning - The air you're breathing doesn't have enough oxygen.
Oxygen warning - The air you're breathing doesn't have enough oxygen.
![]() Pressure warning - Pressure levels are too high (red) or too low (black). Low and high pressures can kill you.
Pressure warning - Pressure levels are too high (red) or too low (black). Low and high pressures can kill you.
![]() Toxin warning - You are breathing in toxic gases.
Toxin warning - You are breathing in toxic gases.
![]() Fire warning - The air is hot enough to burn you.
Fire warning - The air is hot enough to burn you.
![]() Freeze warning - The air is cold enough to freeze you.
Freeze warning - The air is cold enough to freeze you.
![]() Temperature warning - You're too cold or too hot.
Temperature warning - You're too cold or too hot.
![]() Hunger warning - You're starting to get hungry. You cannot die from hunger, but the longer you go without food, the slower you will be able to run. You can also eat too much and become bloated.
Hunger warning - You're starting to get hungry. You cannot die from hunger, but the longer you go without food, the slower you will be able to run. You can also eat too much and become bloated.
Controls[]

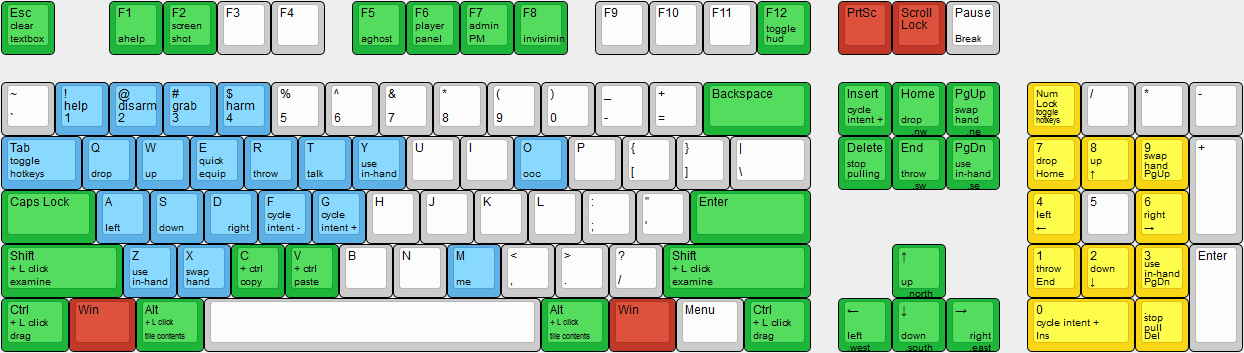
Keybindings for the hotkey mode
There might seem like quite a few controls, but don't worry - you'll only be using a few the majority of the time. There's a lot of edge cases in FO13, due to the sheer nature of features and content available. You can check this page for a list of every keybinding. Although your control scheme was changed to Hotkeys in the Game Preferences menu, it may not have applied itself - if there is a large red bar going across the bottom of the screen, click somewhere on the game window and press Tab. This is the manual toggle for hotkey mode - if the bar changes to white, you're good to go.
- Use WASD to move.
- Press T to talk.
- If you add a semicolon before anything else, you'll transmit your message to the general chat radio.
- You can speak on department specific radio channels - the format is the same for each, just with a different letter. To speak on the medical channel, for example, type .m before your message. (You can also use :m or #m)
- Press O for OOC chat.
- Be careful not to mix the two chat buttons up - your cry for help might end up going in OOC, where anyone can see it at any time.
- Press M to write an emote.
- This is for nonverbal actions - for example, writing "sighs." in the text box would show as "[Character Name] sighs."
- Click on objects in the game world to interact with them. For most, you'll need to be next to or ontop of the object.
- This is used for things such as interacting with computer terminals, picking up items, using an item on something, or attacking someone.
- Right-click on something to open the context menu.
- This is slow and clunky, and you can usually perform most actions with hotkeys. There are a few examples of actions that can only be done with a right-click, but they're far and few between.
- Hold Control and click on something to drag it.
- This won't work if the item in question is fixed in place. You can use this to drag almost anything otherwise.
- Press H, Delete or use the pull
 icon to stop dragging.
- Hold Shift and click on something to examine it.
- Press X or Middle Mouse Button to change your selected hand.
- Your selected hand is the one that will pick up an object (if empty) or use the object in that hand (if holding something). You can tell which is selected by the small box around one of your hands.
- Clickdragging is used for a couple of specific actions.
- For example, to climb onto a table, drag and drop your character to the table.
- To put things on/take things off of someone, drag and drop their character onto yourself. (To put things on them, you'll need to have the item in your selected hand.)
- You can open a container without holding it in your hand by alt-clicking it or clickdragging it onto yourself. This also works for storage items you're wearing, which is useful if your hands are full.
- You can also buckle yourself/other people to chairs using this. It can be tricky, as you have to be on top of the chair, and your mouse has to be on top of the chair's exposed sprite.
Gameplay Concepts[]
|
Chowder McArthor, the Survivor says: "I'm not saying you should find a gun right now, but it would probably be in your best interest to find a trouble*shooter* sooner than later. There's a raider that's popular around here and his name is Trouble." |
Before getting into anything else, it's important to note that since FO13 is such an open ended game that has other people in it, when you get in game and try to follow the guide, things may go wrong - the Vault might have been almost entirely consumed by toxic gas, rabid communist monkeys could be released from a hidden vault to attack the wastes, or something no one could have predicted will kill you. It's important to not let death get to you. There are multiple ways you can be brought back into the game - don't get frustrated if something happens. Worst case scenario you can always respawn.
There's a few specific concepts that are often stumbling blocks for newer players, so let's address those first. (These are all in expandable boxes to save space, but it's not a bad idea to read them beforehand.)
The Hands System heh[]
One of the things the majority of new players have trouble with is the hands system. It's not complex once you've figured it out, but it can be difficult to understand without help.
You have two hands at your disposal. The bright box around one of your hands is the selected hand. This is the hand that's used whenever you click on something - if it's empty, you'll either pick up an item, or interact with something (like a computer terminal or vending machine).
If you have something in your selected hand, you'll use that item on whatever you click on. This can lead to confusion, because if you have something in your hand, you can't use things such as terminals or vending machines - you'll either hit the object with your item or do nothing.
This is because you're trying to directly use the item on the object - this is why you're able to use a screwdriver to open the panel on a door, use wirecutters on a grille, or similar actions.
This can also cause problems with backpacks, boxes, and other containers - if you want to open a container, alt click it. You can also pick it up, then switch hands and click on the container with an empty hand. Clicking on a container with an object will put it in the container. This also means that if you'd like to take your backpack off, you need to click and drag the bag to an empty hand - a normal click just opens the equipped bag.
Intents[]
The intent selector has four modes: Help, Disarm, Grab, and Harm.
Help Intent []
The Help intent is used for helpful interactions. For example, if someone is in critical condition, clicking on them (with an empty hand) will have you perform CPR. You'll also apply medication if you're holding any. In addition, if you have your intent on Help, and walk into someone who also has their intent on Help, you'll swap places with each other (instead of just pushing them in the direction you're moving). Be careful - if you have an item in your hand that isn't designed to help someone, you'll still attack them with it!
Disarm Intent []
The Disarm intent is used to nonlethally disarm and incapacitate people. With disarm selected, when you click on another player's sprite, you will attempt to remove whatever is in their hands, with a chance of knocking them on the ground.
Grab Intent []
The Grab intent allows you to, as it says, grab people. Grabbing someone with Grab intent works differently from control-clicking. If you click on someone with an empty hand, you'll have a passive grab, which makes you pull people. You stop dragging the same way you stop pulling. See Keyboard Shortcuts or click "pull" to release. Dragging prone people will slow you down. While on passive grab, clicking on the person once more upgrades it to an aggressive grab. The target can press "resist" to try to escape from an aggressive or above grab level. Once you have an aggressive grab, you can either throw the person (by enabling throwing, then clicking somewhere), fireman carry them if they're prone (by click dragging their sprite onto yours), or click them again to slowly upgrade the grab to a level 3 neck grab. On neck grab you deal no damage, but it's harder for them to resist and get away. Click them one last time to slowly upgrade the grab to level 4, strangling. When strangling you deal suffocation damage to the target, and the target has the lowest chance (5% per try) to successfully resist out of the grab. Failing to resist out of a grab will deal some stamina damage to you. Grabs are harder to break out of the more stamina and brute damage you have (especially stamina), but there is always at least 5% chance per try.
Harm Intent []
The Harm intent will harm. On standing targets you will attempt to punch them, which deals 1.5-15 stamina and 1-10 brute damage. The chance to miss a punch increases the more stamina and brute damage you have. Punching has a chance to knockdown the target for at least 4 seconds. The more brute and stamina damage the target has, the longer the target will be knocked down. If using harm intent on prone targets you will kick them, which deals 1.5-15 brute damage, with no chance to miss.
Damage[]
There are a few different damage types in SS13. If you take enough damage, you'll fall unconscious into critical condition, better known as Crit. If left untreated in this state, you'll slowly suffocate until you die.
Brute damage is received from physical attacks - punches, kicks, toolboxes, hatchets - if someone is hitting you over the head with it, it does Brute damage.
Burn damage is received from fire or exposure to the vacuum of space.
Toxin damage is received from breathing in poison gases, attacks from enemies like giant spiders, ingesting poison, drinking too much booze, or generally having any harmful chemical in your blood.
Oxygen damage is received from being unable to breathe, or while in critical condition. It goes down over time by itself if you're not in crit.
Brain damage is received from being cloned or other things. Can randomly cause brain traumas. Those suffering from brain damage usually need chemicals to cure their condition.
Cellular damage is reveived from being cloned or from being fed on by a slime. Can be cured with cryo treatment.
Brute and Burn damage are applied to specific limbs. If you've been smacked in the head with a toolbox a few times, you'll have to aim at your head (with numpad keys) when you use a bruise pack. Most medicines can be ingested to heal damage anywhere on your body. If you take enough damage to one limb, you can be dismembered. You will need surgery to replace lost limbs.
Combat[]
Combat in SS13 is very heavily focused on who falls over first. If you're prone, you've likely lost. This means items like soap or disablers are extremely useful.
If you get into a fight, consider your options - it may be best to try and simply run away. If you think you can disarm your opponent, you could turn the tables by taking their weapon. Combat in SS13 is fast paced and revolves around a lot of back and forth swipes, almost like a strange joust between 2D spacemen.
Getting better at combat in SS13 requires practice - there's only so much you can be taught. The rest is learning how to create and take advantage of opportunities. Hopefully, you won't have to get into many fights as you start out.
To learn more about combat and how to win fights, see the Guide to Combat.
Ghosts[]
If you end up dying, don't worry, there's a few ways to go from there.
If you try to move, you'll ghost out of your corpse. This is essentially spectator mode - you can communicate with other dead players (and talking about the round out of character is okay in this chat) by talking normally and are able to fly around the entire map. (Note that while it's okay to talk about the round in deadchat, if you're revived, you cannot use any information gained while dead. Anything you saw while alive is fair game.)
If you die, you can be cloned, revived via defibrillator, turned into a podperson, have your brain removed and put into a cyborg, or more. There are ghost roles that can be played by dead players - some areas have objects that, when clicked on as a ghost, will spawn you as a new character. (You're a new character, so don't use any information from your past life.) There may even be alerts that pop up while you're dead, asking if you'd like to take control of a xenomorph, a Super Mutant, or almost anything else. These are often provided by admins, but can occasionally happen via random event. Please note that if you take on a ghost role you CANNOT be cloned or return to your original body!
Playing the Game[]
Now that we've gone over the interface and some more important game concepts, let's jump into the game. If you join a game in progress, you'll be spawned in either a faction base, or a random area of the wasteland depending on what role you actually chose.
Bad Deathclaw has multiple maps that the server will occasionally change to. The "standard" station layout is Pahrump, there are other maps, however there is no rotation at this time.
Since you've chosen Recruit Trooper as your role hopefully, you'll have nearly no responsibilities. Listen to anyone else in an NCR Uniform and do your best to play the clueless recruit. Because guess what, you are! This guide will list a few tasks for you to perform so you can put the concepts discussed above into practice. It might be awkward at first, but it doesn't take much time to get to grips with how to control your character.
|
|
What Jobs to Take After Your First Round[]
- After you've gotten used to the controls and general idea, you might want to move to a role such as Den Doctor, Scientist, or Initiate Scribe - these jobs require a slight amount of skill with the controls, and have more depth to them than some of the general roles.
- Don't play leadership roles like the NCR Sergeant or Prime Decanus until you're proficient with the controls and know enough about the game to give orders and not get your group killed. Nothing's worse than being led into a box canyon by a leader and getting massacred by the unhappy locals behind you.
- After some time, when you're confident enough in your combat abilities, begin searching for dungeons with other players. They are sporadic across the wastelands and the best loot is rarely found just sitting in the open.